How to create a quiz in Moodle
Learn how to create a Moodle quiz with step-by-step instructions, from setting up questions to configuring quiz settings, ensuring an effective assessment tool for educators.
Moodle version: 4.5 Estimated time: 15 minutes (for a basic quiz with a handful of questions) Difficulty: Beginner
Why you'd use this
Quizzes let you test student understanding, run practice exercises, or deliver formal graded assessments inside your course. Once set up, Moodle handles delivery, automatic marking for most question types, and recording results in the gradebook. This guide covers creating an empty quiz activity, configuring its core settings, and adding questions to it.
Before you start
Permissions required:
- Teacher or Editing teacher role in the course (or a Manager role with the capability
mod/quiz:addinstance)
You'll need:
- The course already created, with Edit mode available to you
- The section or topic in the course where you want the quiz to appear
- Your questions prepared, or at least a clear idea of what types you'll use (multiple choice, true/false, short answer, etc.)
- Decisions on the basics: time limit (if any), number of attempts allowed, and whether grading counts toward the course total
Not sure if you have the right permissions? Open your course and look for the Edit mode toggle in the top-right of the page. If you can see it and turn it on, you have what you need.
Step-by-step
Step 1: Open your course and turn on edit mode
Navigate to your course from the My courses page or the Dashboard. In the top-right of the course page, switch the Edit mode toggle on. You'll now see Add an activity or resource links appear under each course section.
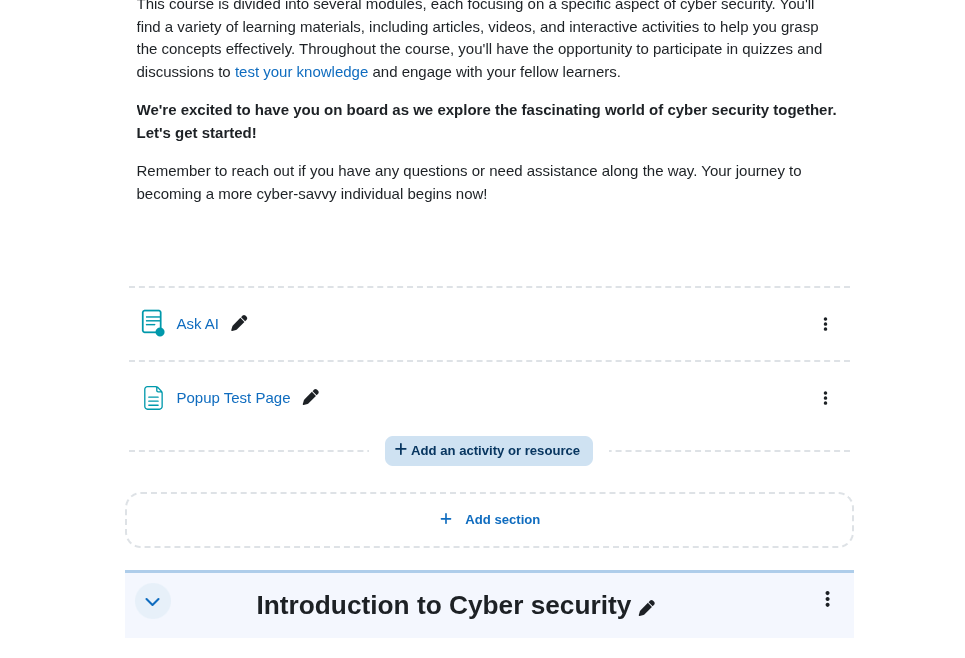
Step 2: Add a quiz activity
Go to the course section where you want the quiz to live. Click Add an activity or resource at the bottom of that section. The Activity chooser will open in a pop-up.
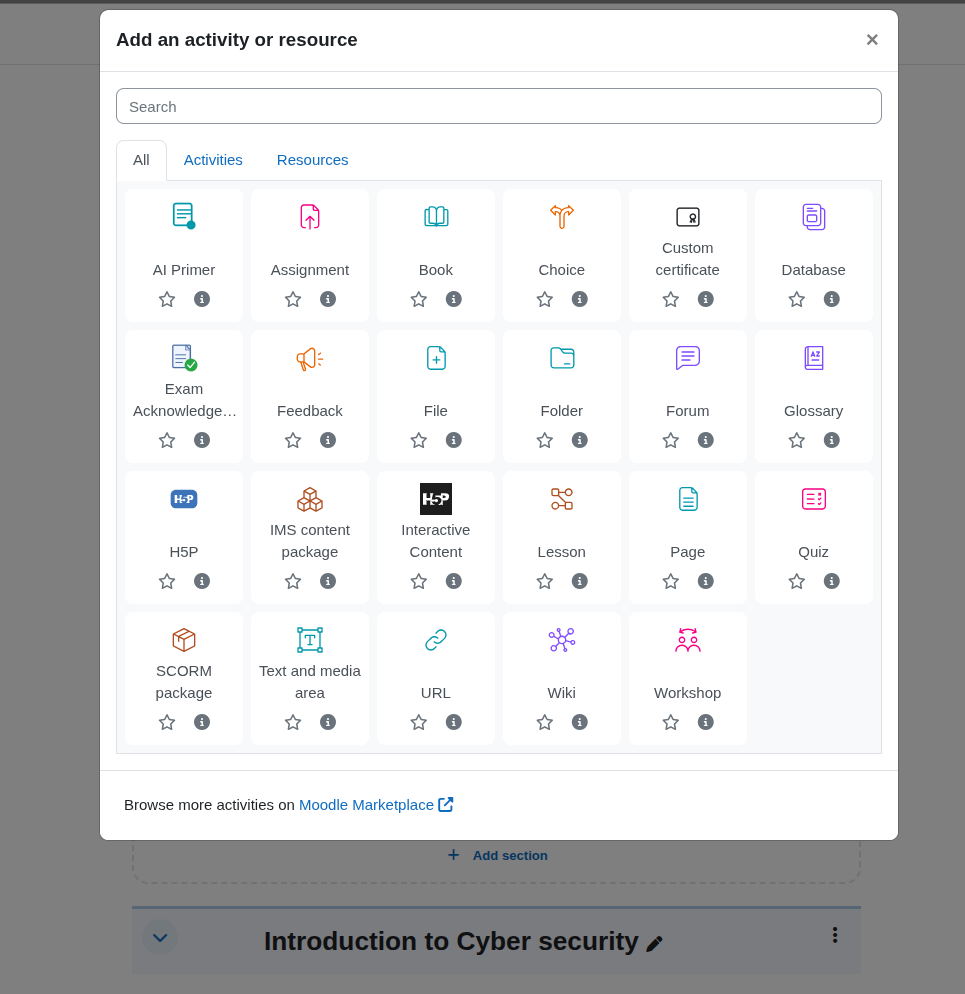
Step 3: Choose Quiz from the activity chooser
In the Activity chooser, find and click Quiz. You can use the search field at the top of the chooser, or scroll through the All tab. Clicking the tile opens the new quiz setup form.
💡 Tip: Click the star icon on the Quiz tile to add it to your Starred tab for faster access next time.

Step 4: Give the quiz a name and description
In the General section at the top of the form:
- Enter a clear name in the Name field this is what students will click on in the course.
- Optionally, add instructions or context in the Description field. If you want the description shown on the course page itself, tick Display description on course page.

Step 5: Set timing options
Expand the Timing section. The most common settings here:
- Open the quiz and Close the quiz: Enable these and set dates if you want a window during which students can attempt the quiz.
- Time limit: Enable and set a duration if students should only have a fixed amount of time once they start.
- When time expires: Decide what happens when the clock runs out. The default, Open attempts are submitted automatically, is usually what you want.

Step 6: Set grade and attempts options
Expand the Grade section:
- Grade category: Leave as default unless you've set up gradebook categories.
- Grade to pass: Enter a number if you want a pass threshold (used for activity completion and conditional access).
- Attempts allowed: Set how many tries each student gets. Unlimited is fine for practice; 1 is typical for graded assessments.
- Grading method: If you allow multiple attempts, choose how the final grade is calculated (Highest grade, Average, First attempt, or Last attempt).

Step 7: Configure layout, question behaviour, and review options (optional)
These sections are collapsed by default and the defaults are sensible for most quizzes. Worth a quick look:
- Layout: Controls how many questions appear per page.
- Question behaviour: Shuffle within questions randomises answer order; How questions behave controls feedback timing (e.g. Deferred feedback waits until submission).
- Review options: Controls what students see after submitting (their answers, the correct answers, feedback, etc.).
💡 Tip: If this is a high-stakes assessment, untick The attempt and Right answer under the After the quiz is closed column only if you don't want students to see correct answers later.

Step 8: Save the empty quiz
Scroll to the bottom and click Save and display. The quiz is now created, but it has no questions in it yet , you'll see a page saying No questions have been added yet.
Step 9: Open the question editing screen
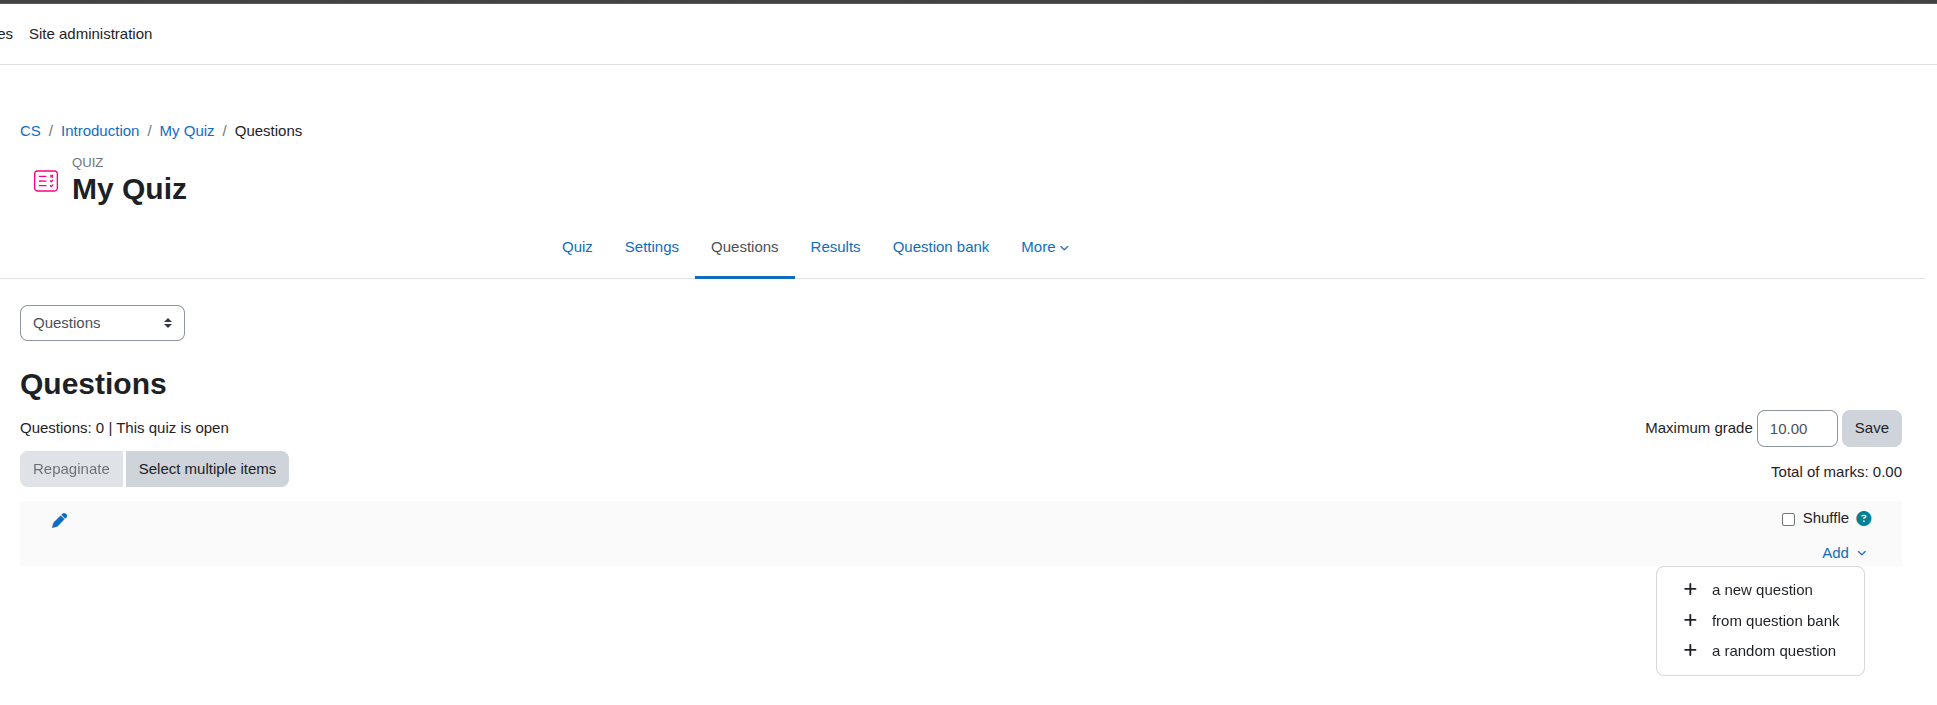
On the quiz page, click the Questions tab near the top of the page (next to Settings, Results, and others). This opens the editing screen where you build the quiz contents.

Step 10: Add questions to the quiz
Click Add on the right side of the page. You get three options:
- + a new question: Write a new question from scratch.
- + from question bank: Pick existing questions you or a colleague have already created.
- + a random question: Pull a random question from a category, useful if you want every student to get a slightly different quiz.
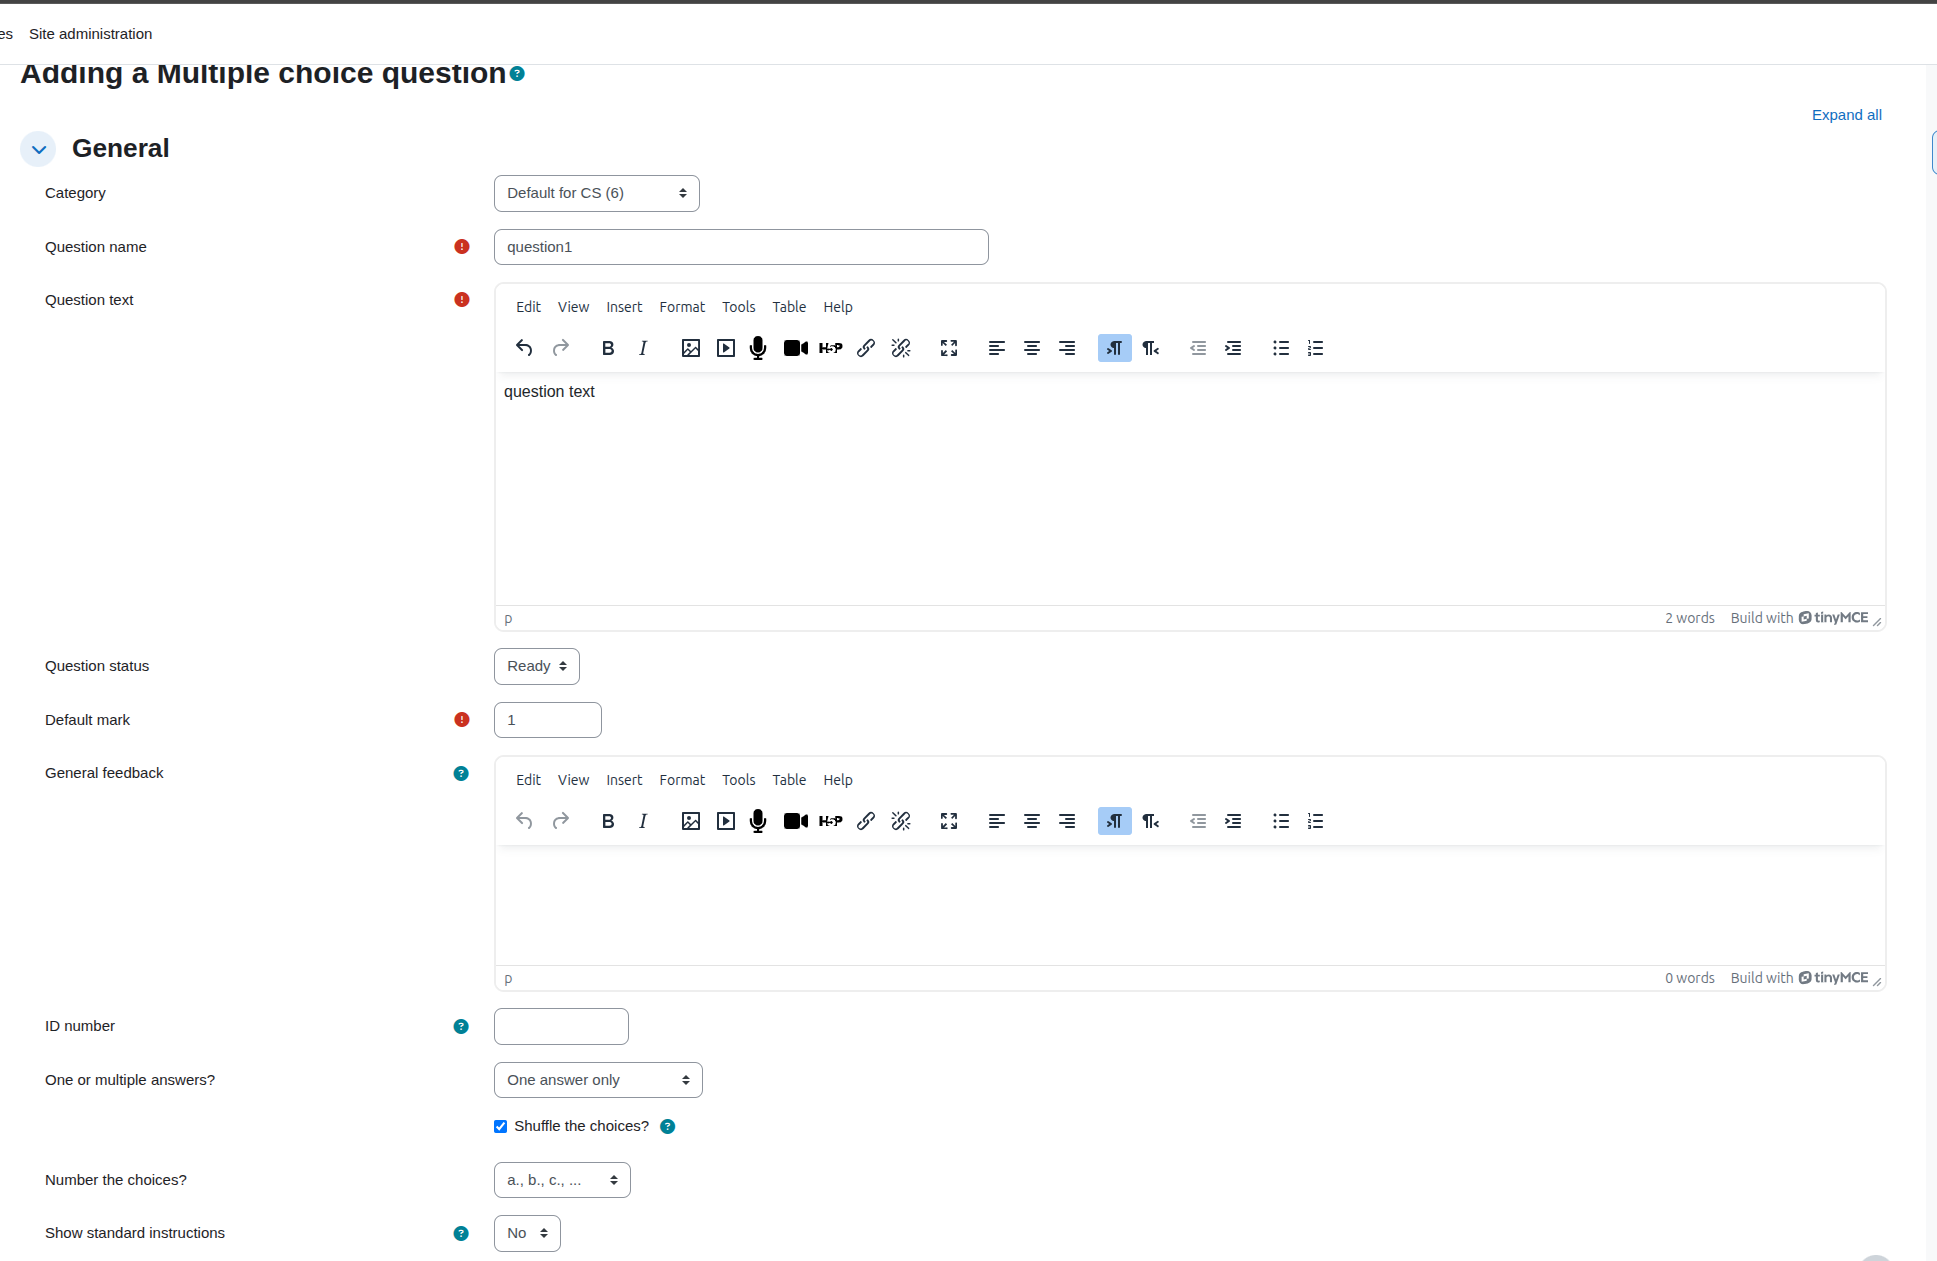
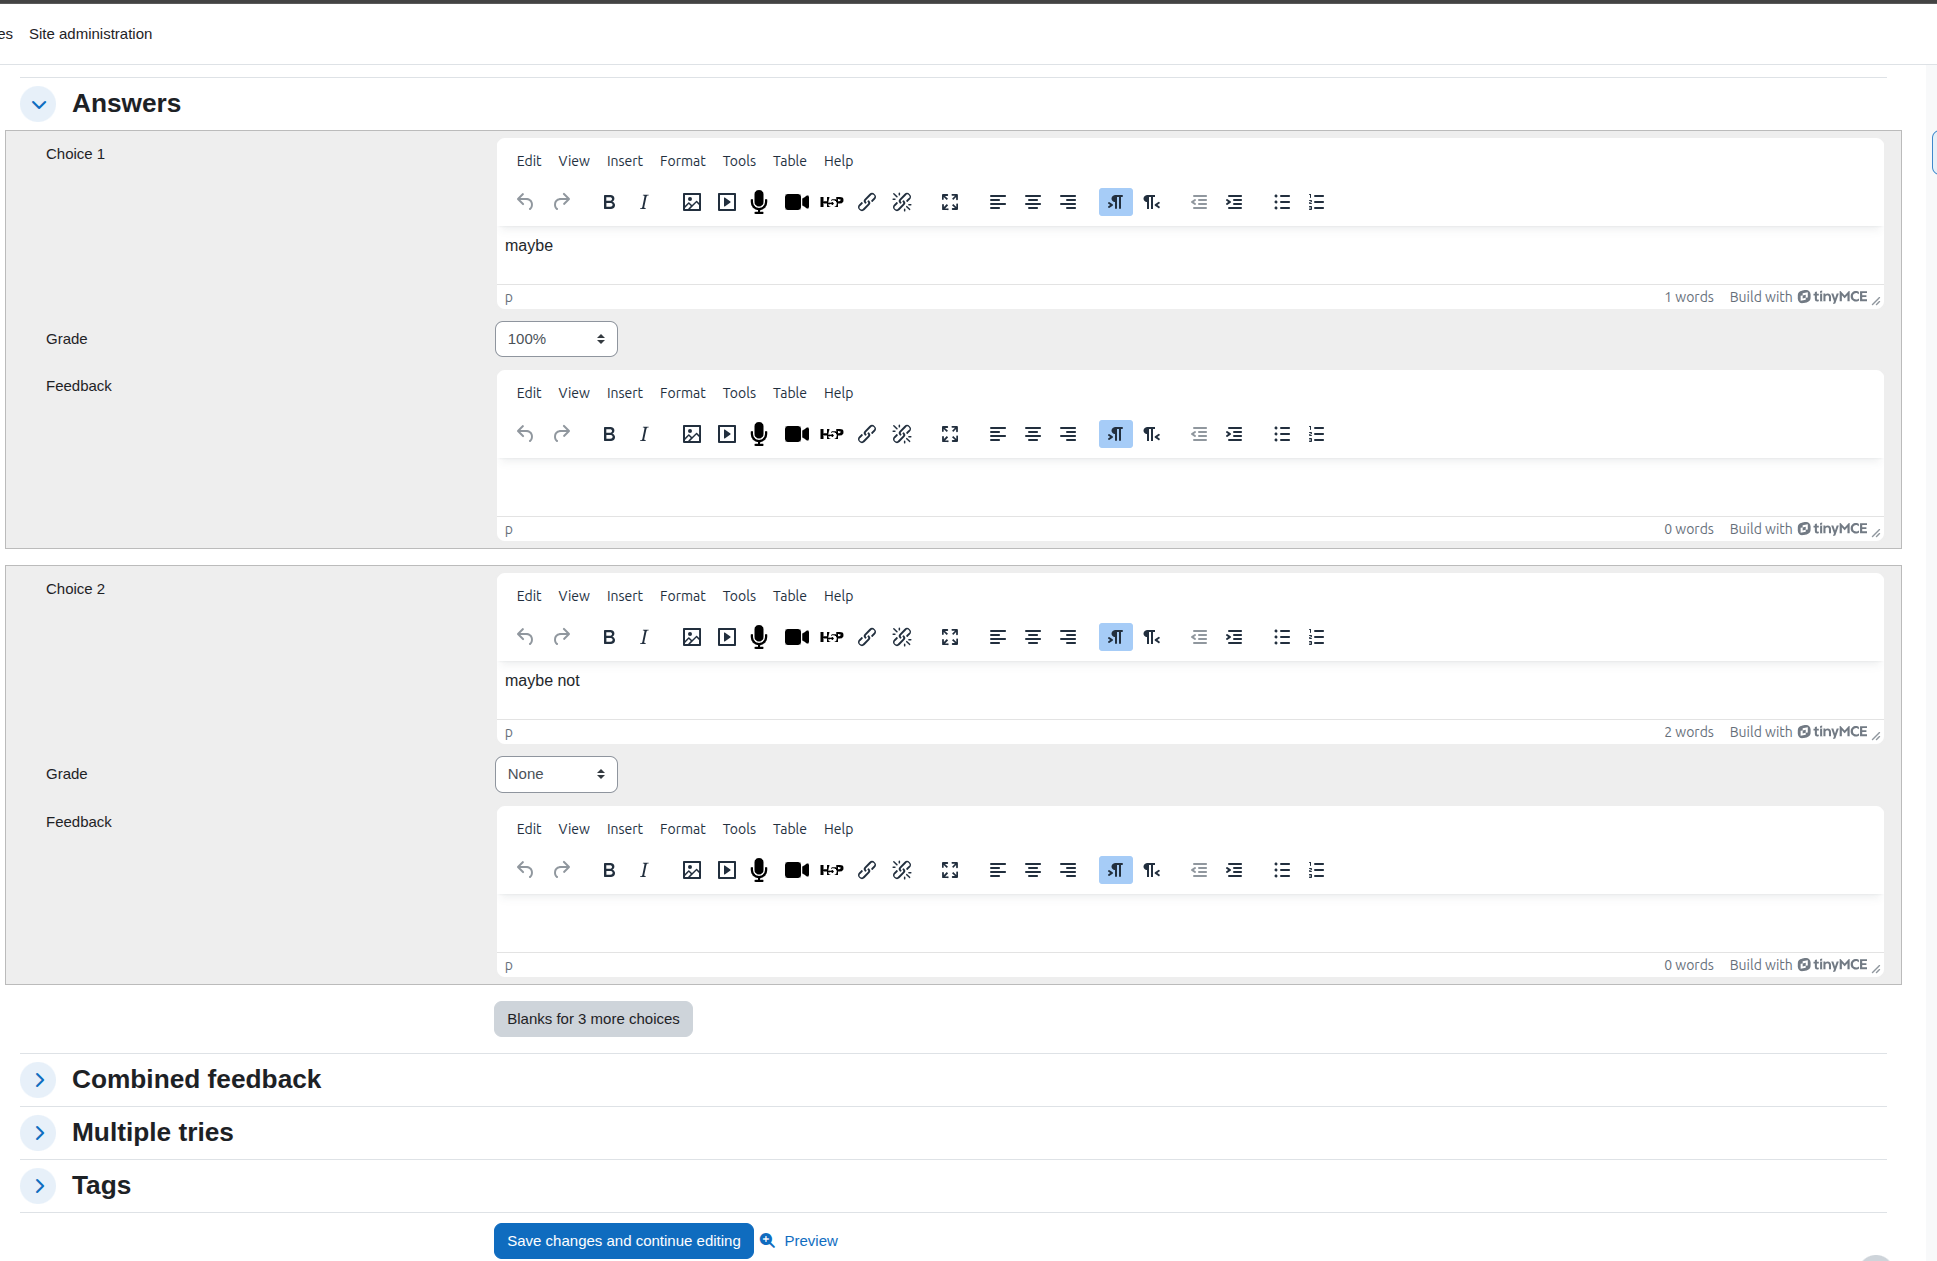
Choose + a new question, pick a question type (e.g. Multiple choice), click Add, fill in the question form, and click Save changes. Repeat for each question.
💡 Tip: If you'll reuse questions across quizzes, build them in the Question bank first (under the quiz's Question bank tab) and then use + from question bank to pull them in.
Step 11: Set the maximum grade and question marks
At the top of the Questions tab, set the Maximum grade this is what the quiz is worth in the gradebook (commonly 10 or 100). Each question has its own Mark value (the small number next to it) which you can edit by clicking the pencil icon. Moodle scales the total marks to match the maximum grade.
Click Save next to the Maximum grade field when you're done.
Step 12: Preview the quiz
Go back to the quiz's main page (click the quiz name in the breadcrumb). Click the Preview quiz button to take the quiz yourself exactly as a student would. This is the best way to catch typos, broken questions, or wrong answer keys before students see it.


Check it worked
Return to the course main page. The quiz should appear in the section where you added it, with the name you gave it. Click into it you should see the description (if you added one), the open/close dates (if set), and a Preview quiz button (because you're a teacher). When a student opens it during the quiz window, they'll see an Attempt quiz button instead.

Common problems
- Students say they can't see the quiz: Check the quiz isn't hidden. On the course page, the quiz should not have a "Hidden from students" label under it. If it does, click the three-dot edit menu next to it and choose Show.
- The quiz says "No questions have been added yet" even after you added some You may have added questions to the Question bank but not to the quiz itself. Go to the Questions tab on the quiz and use Add → + from question bank to pull them in.
- The grade in the gradebook doesn't match the marks in the quiz Moodle scales the sum of question marks to the Maximum grade value. If the maximum grade is 10 but your questions total 20 marks, every score is halved. Adjust Maximum grade to match the marks total if you want a 1:1 result.
- The time limit isn't being enforced Check that Time limit is ticked (not just filled in) in the Timing section of the quiz settings, and that When time expires is set to Open attempts are submitted automatically.
Looking to enhance your Moodle experience? EssingtonITS offers expert IT services to optimise your learning platforms. For tailored Moodle hosting and support, explore our dedicated e-learning services at myelms.co.uk. Let us help you achieve seamless and efficient e-learning solutions.
Moodle is a registered trademark of Moodle Pty Ltd. This channel is independently operated by EssingtonITS and is not affiliated with or endorsed by Moodle.
person people found this useful.