How to Create a User in Moodle
Learn how to manually create a user account in Moodle 4.5, ideal for onboarding staff or adding external trainers when self-registration is disabled. This step-by-step guide requires site administrator permissions.
Moodle version: 4.5 Estimated time: 3 minutes Difficulty: Beginner
Why you'd use this
When someone needs access to your Moodle site and can't self-register or when self-registration is turned off, a site administrator can create their account manually. This is common when onboarding staff, adding external trainers, or setting up test accounts. Once created, the user can log in straight away with the credentials you set.
Before you start
Permissions required:
- Site administrator role, or a Manager role with the capability moodle/user:create
You'll need:
- The new user's first name and last name
- An email address for the user (must be unique on the site)
- A username for the user (must be unique on the site — no spaces allowed)
- A decision on whether to set a password yourself or force the user to create one on first login
Not sure if you have the right permissions? Go to Site administration in the left-hand navigation if you can see it, you have the access needed for this guide; if not, ask your Moodle administrator.
Step-by-step
Step 1: Open Site Administration
From any page in Moodle, click Site administration in the primary navigation at the top of the page, or in the left-hand drawer if your theme uses one.
Step 2: Navigate to the Users section
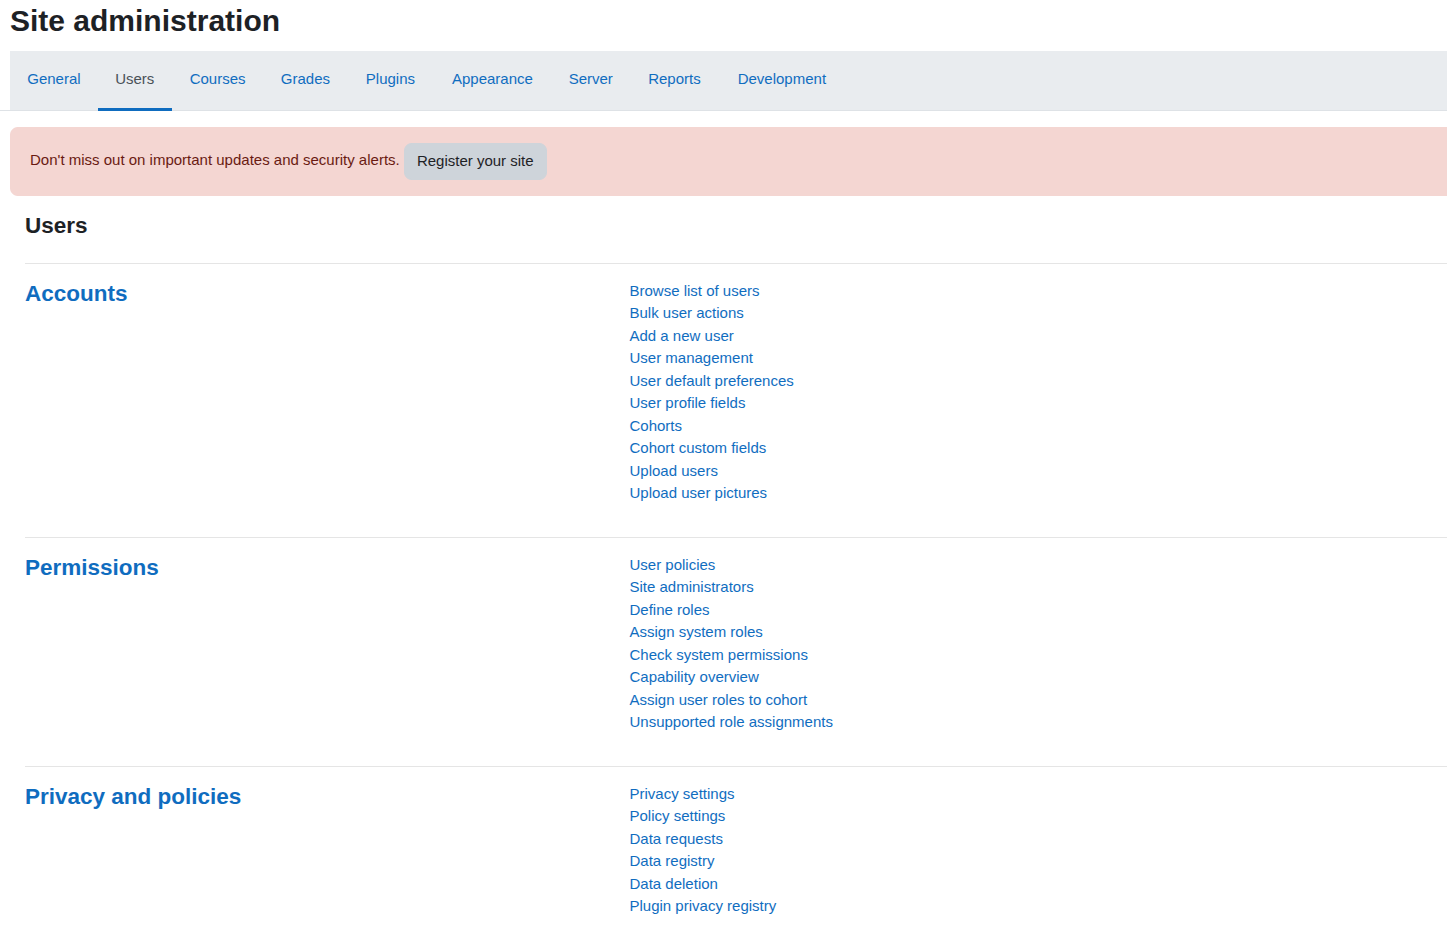
In Site administration, click the Users tab. This reveals a submenu of user management options below it.
Step 3: Open the Accounts list
Under the Accounts heading, click Add a new user. This takes you directly to the new user creation form you do not need to go through the user list first.
Tip: You can also reach this page via Site administration > Users > Accounts > Browse list of users, then clicking the Add a new user button at the top of that page. Both routes lead to the same form.
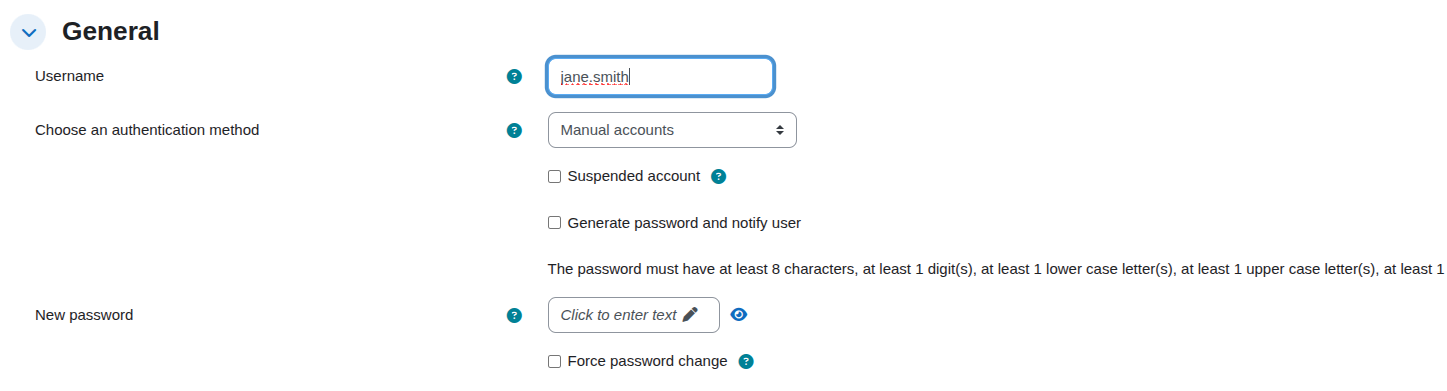
Step 4: Enter the username
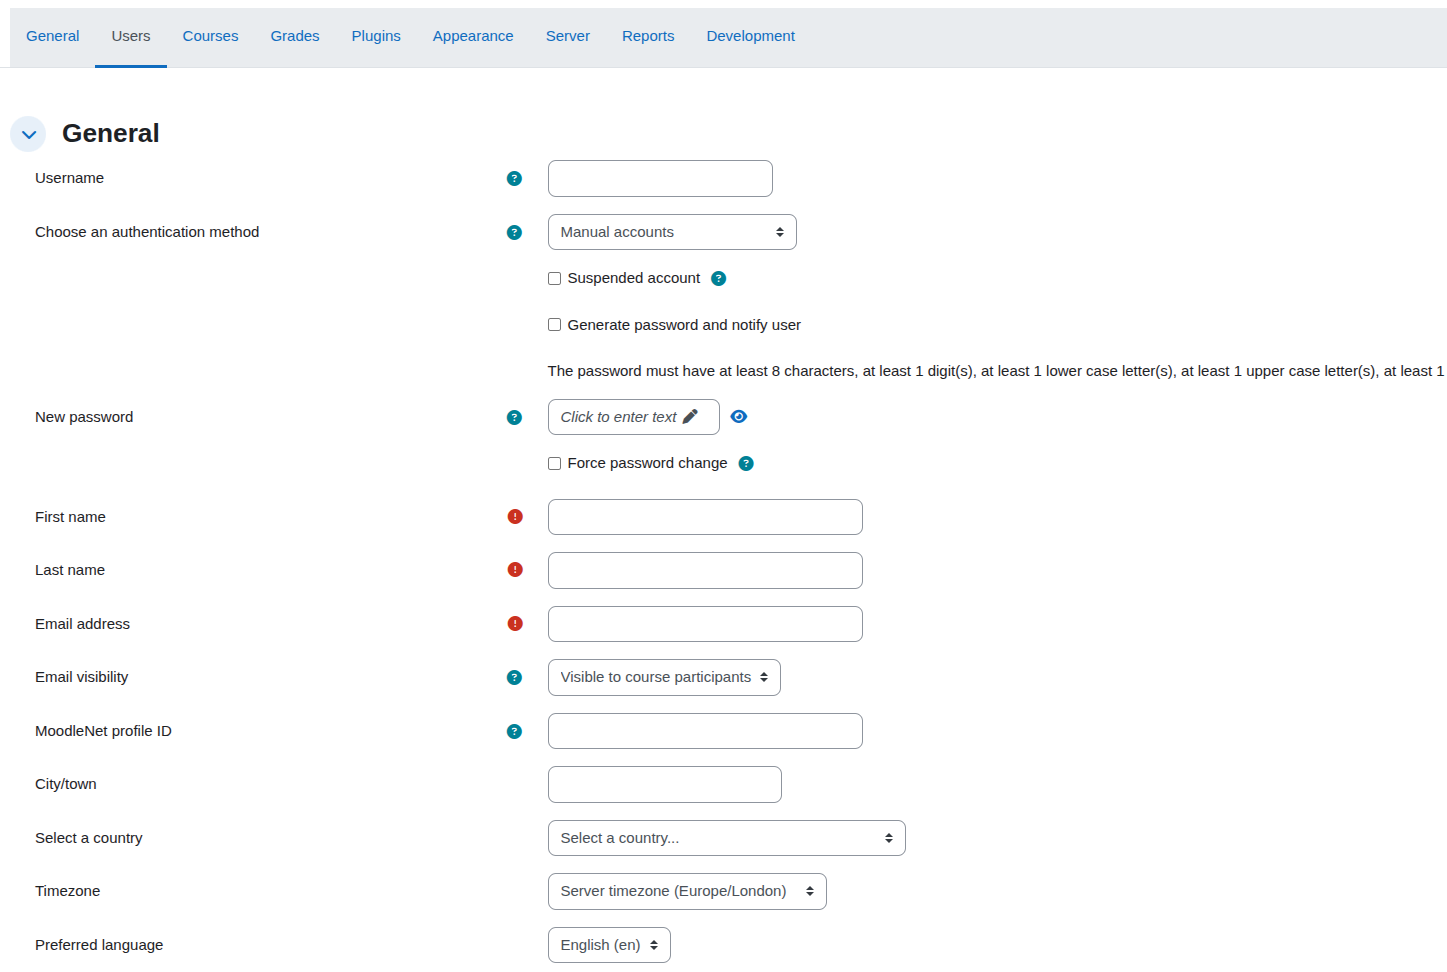
In the Username field, type the username the person will use to log in. Usernames must be lowercase, contain no spaces, and must be unique across the site. A common convention is firstname.lastname (for example, jane.smith).
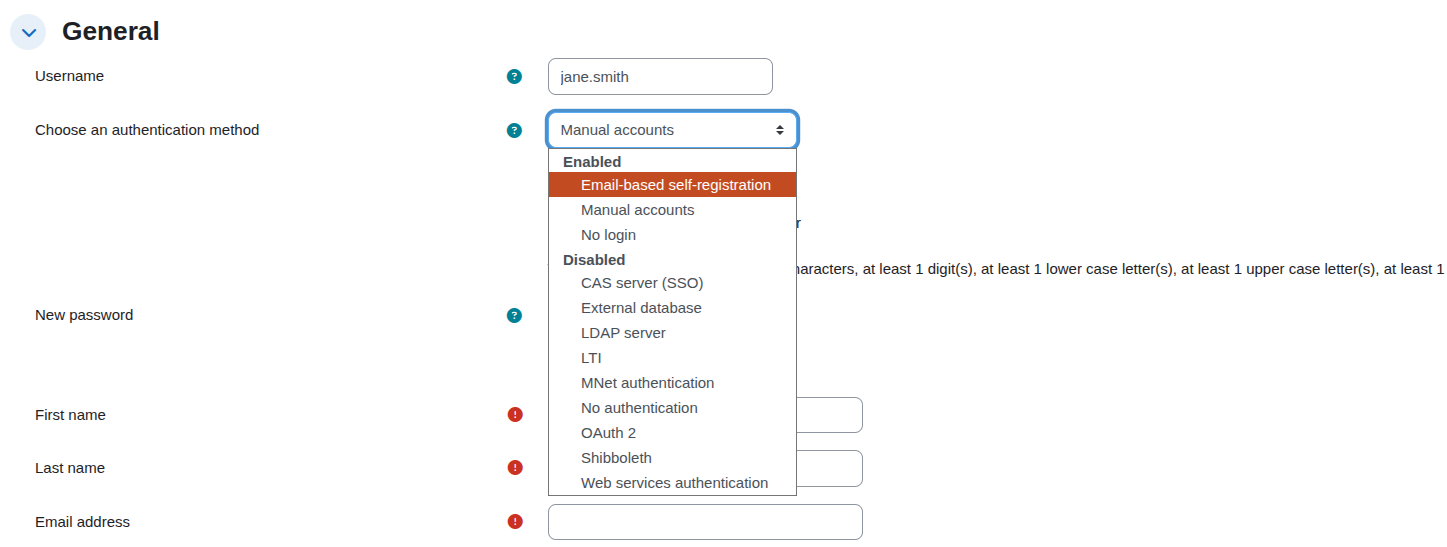
Step 5: Set the authentication method
The Choose an authentication method field is set to Manual accounts by default. Leave this as-is unless your site uses a specific external authentication method (such as LDAP) and you have been told to use it here.
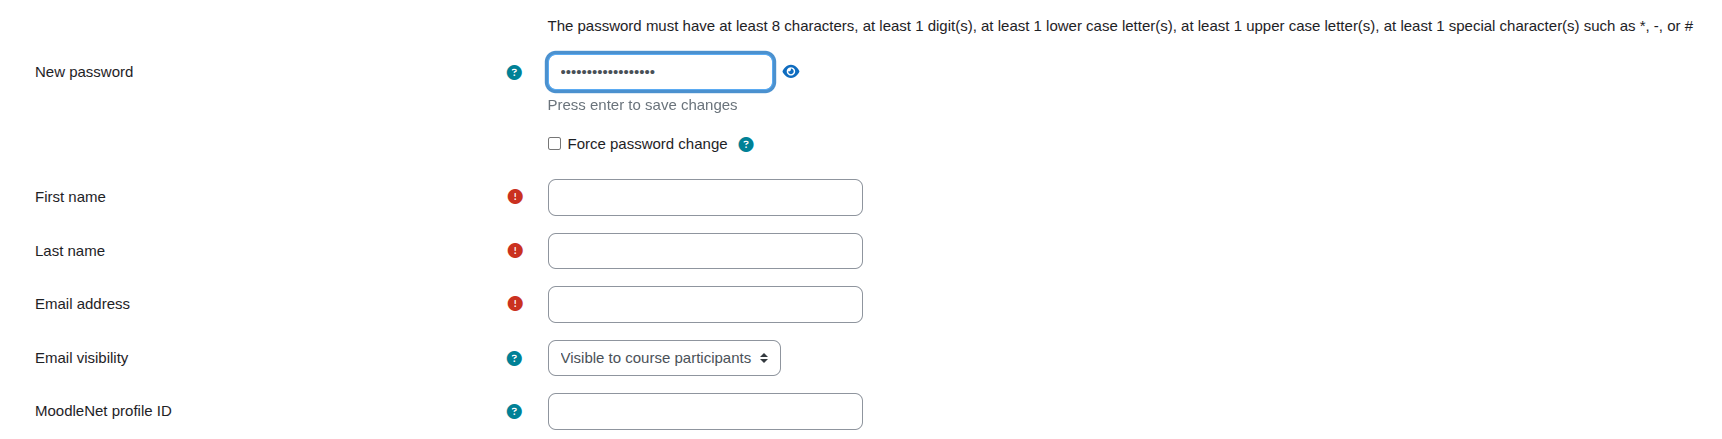
Step 6: Set a password
You have two options here:
- Set the password yourself: Click New password, type a password that meets your site's password policy, and check the Force password change box so the user is prompted to choose their own password when they first log in. This is the recommended approach.
- Send a welcome email instead: Check the Generate password and notify user box. Moodle will email the user a link to set their own password. This requires the user's email address to be correct, so complete Step 7 first if you choose this option.
Warning: If you select Generate password and notify user, Moodle will send an email to the address you enter the moment you save the form. Make sure the email address is correct before saving.
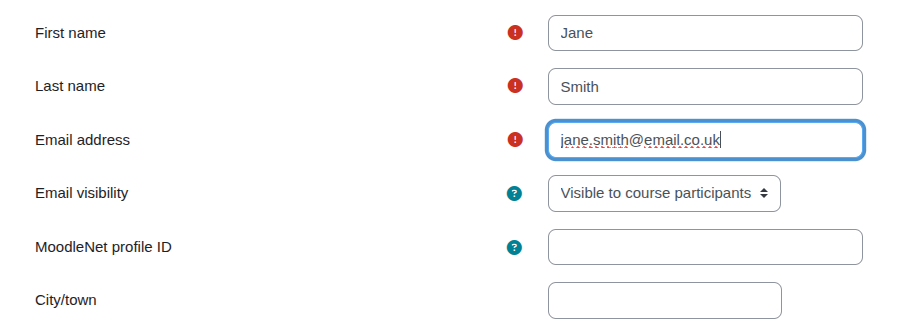
Step 7: Enter the user's name and email address
Fill in the following required fields:
- First name
- Last name
- Email address, this must be a real, unique email address. Moodle uses it for notifications and password resets.
Step 8: Complete any optional fields
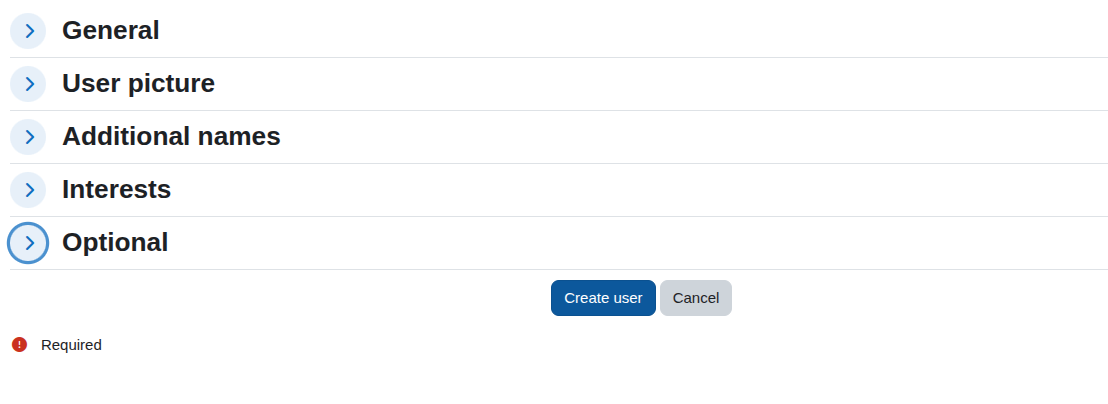
The form includes optional sections for city/town, country, timezone, description, and profile picture. Scroll through and fill in any that are relevant. These can all be edited later, so it's fine to leave them blank now.
Step 9: Save the new user
Scroll to the bottom of the form and click Update profile. Moodle will save the account and return you to the user's profile page.
Tip: The button is labelled Update profile even when creating a brand-new user this is expected in Moodle 4.5.
Check it worked
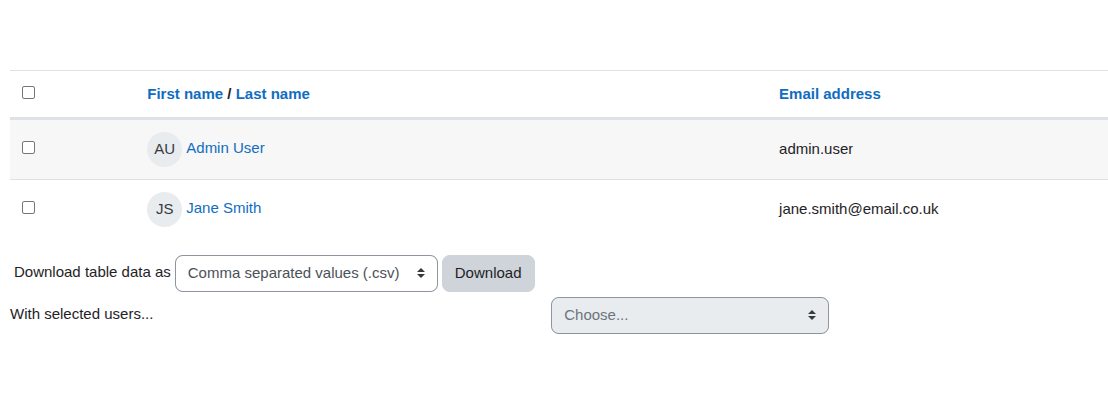
After saving, you should land on the new user's profile page, showing their name, username, and email address. To confirm the account is active, go to Site administration > Users > Accounts > Browse list of users and search for the name or email you just entered the user should appear in the list with the correct details.
If you chose to send a welcome email, ask the user to check their inbox (and spam folder) for a message from your Moodle site.
Common problems
- "Email address already exists": Another account on the site is already using that email address. Search for it in Browse list of users to find the existing account. Each user must have a unique email.
- "Username already exists": The username is taken. Try a variation, such as adding a number (e.g. jane.smith2).
- The welcome email didn't arrive: Check that your Moodle site has outgoing email configured correctly. Ask your administrator to check Site administration > Server > Email > Outgoing mail configuration. Also ask the user to check their spam folder.
- The password won't save / validation error: Your site has a password policy (minimum length, special characters, etc.). Go to Site administration > Security > Site policies to check the requirements, then try a password that meets them.
- The new user can't see any courses: Creating a user does not enrol them in any course. You'll need to enrol them separately see How to Manually Enrol a User in a Course.
Looking to enhance your Moodle experience? EssingtonITS offers expert IT services to optimise your learning platforms. For tailored Moodle hosting and support, explore our dedicated e-learning services at myelms.co.uk. Let us help you achieve seamless and efficient e-learning solutions.
Moodle is a registered trademark of Moodle Pty Ltd. This channel is independently operated by EssingtonITS and is not affiliated with or endorsed by Moodle.
person people found this useful.