How to Enrol Students in Moodle
Learn how to manually enrol students in Moodle courses, a quick method for adding a few students or enrolling someone mid-course. Ensure you have the necessary permissions and follow the step-by-step guide to complete the process efficiently.
Why you'd use this
When you create a course in Moodle, it has no students in it by default. You need to enrol students before they can access any of the course content. This guide covers manual enrolment adding students one at a time or in small groups directly from within your course. It's the quickest approach when you have a handful of students to add, or when you need to enrol someone mid-course.
Before you start
Permissions required:
- Teacher role (or higher) in the course, with the capability enrol/manual:enrol
- If you cannot see the Participants option in your course, ask your Moodle administrator to check your enrolment permissions
You'll need:
- The course already created and set up in Moodle
- The full name or email address of each student you want to enrol (they must already have a Moodle account)
- A decision on which role to assign usually Student, but you may also need Non-editing teacher for observers or co-facilitators.
Not sure if you have the right permissions? Open your course and look for Participants in the left-hand navigation if you can see it, you have the access needed for this guide.
Note for Moodle 4.5: The left-hand course navigation drawer introduced in Moodle 4.0 is used throughout this guide. If your site has been customised to hide the navigation drawer, access Participants via the top More menu in the course navigation bar instead.
Step-by-step
Step 1: Open your course
Log in to Moodle and navigate to the course you want to add students to. You can find your courses on your Dashboard or via the My courses menu at the top of the page.
Step 2: Go to the Participants page
In the left-hand navigation drawer, click Participants. This opens a list of everyone currently enrolled in the course.

Tip: If you don't see the navigation drawer, click the hamburger icon (three horizontal lines) near the top-left of the course page to expand it.
Step 3: Open the Enrol users panel
Click the Enrol users button in the top-left area of the Participants page. A panel will slide in from the right side of the screen.

Step 4: Search for the student
In the Search field inside the Enrol users panel, type the student's name or email address. Moodle will show matching accounts as you type. Click the correct person's name to select them — their name will appear highlighted below the search field.
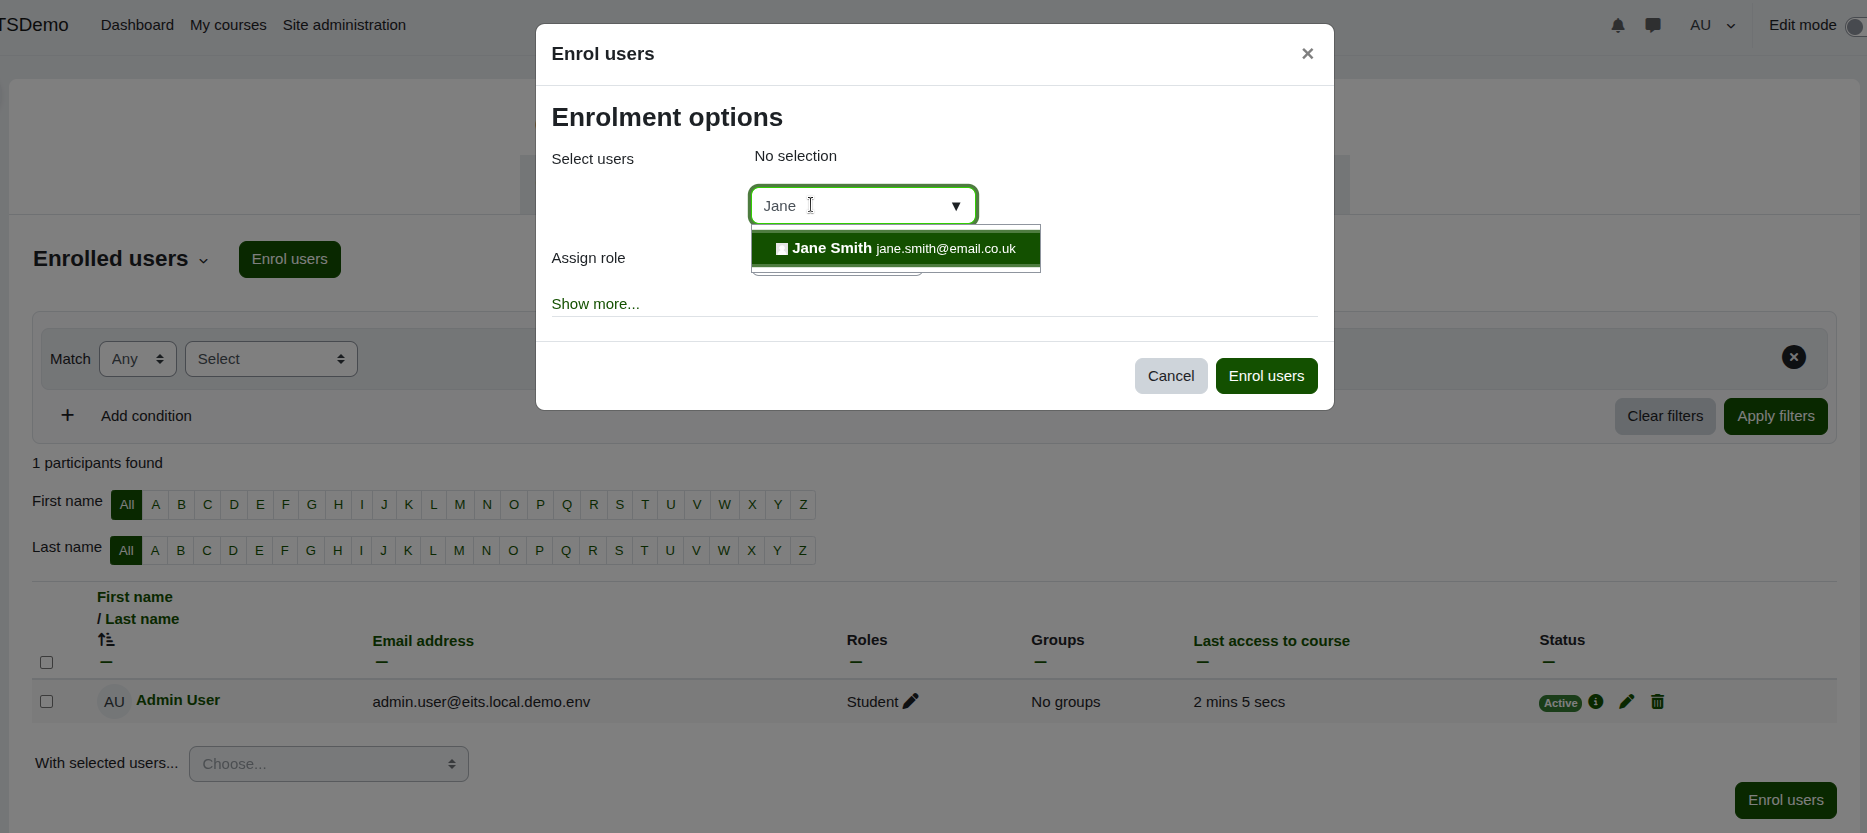
Tip: You can select multiple students before confirming. Search for each person in turn and click their name to add them to your selection. All selected names will appear together, and you can enrol them all in one go.
Step 5: Set the role
Check the Assign role dropdown below the search field. It will default to Student. If you need to assign a different role (for example, Non-editing teacher), click the dropdown and select the appropriate option.

Tip: Most of the time you'll leave this as Student. Only change the role if you have a specific reason assigning the wrong role can give someone unintended access to grades or course settings.
Step 6: Set enrolment duration (optional)
If you want the enrolment to expire automatically — for example, at the end of a term — tick Enable next to Enrolment duration and enter the number of days. Leave this blank if the enrolment should not expire.
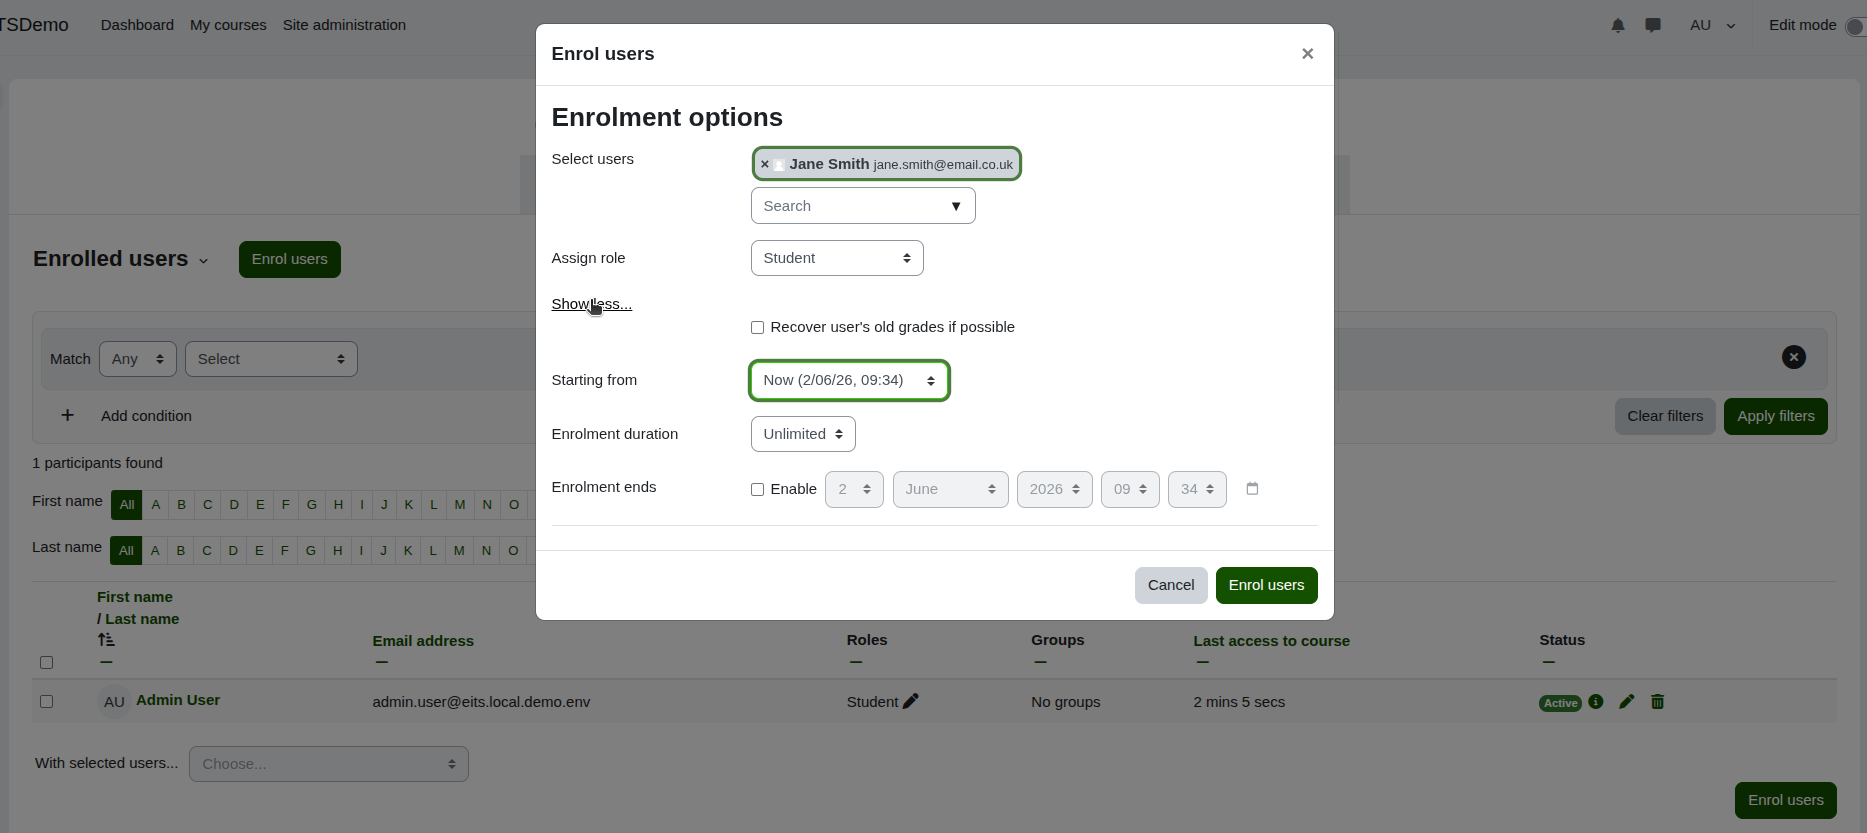
Step 7: Confirm the enrolment
Click the Enrol users button at the bottom of the panel. The panel will close and the students you selected will now appear in the Participants list.
Check it worked
After clicking Enrol users, look at the Participants list on screen. The students you enrolled should now appear in the table with the role you assigned (for example, Student) shown in the Roles column. If you enrolled multiple people, scroll through the list to confirm each one is present. The students will also now be able to log in and access the course.
Common problems
- The student's name doesn't appear in the search: The student does not yet have a Moodle account. Ask your Moodle administrator to create an account for them, or check whether your site allows self-registration. You cannot enrol someone who isn't in the system.
- The Enrol users button is missing: You may not have permission to manually enrol students, or manual enrolment may be disabled for this course. Go to Course settings (the gear icon) and check under Enrolment methods, or ask your administrator.
- The student can see the course but not the content: Check whether the course is hidden. In Course settings, make sure Course visibility is set to Show. Also check whether individual sections or activities have been hidden.
- I enrolled the wrong person: Find them in the Participants list, click the three-dot menu (⋮) to the right of their name, and select Unenrol. Confirm the removal in the dialogue that appears.
Warning: Unenrolling a student deletes their activity data and grades for this course. Only do this if you are certain it cannot be undone.
Looking to enhance your Moodle experience? EssingtonITS offers expert IT services to optimise your learning platforms. For tailored Moodle hosting and support, explore our dedicated e-learning services at myelms.co.uk. Let us help you achieve seamless and efficient e-learning solutions.
Moodle is a registered trademark of Moodle Pty Ltd. This channel is independently operated by EssingtonITS and is not affiliated with or endorsed by Moodle.
person people found this useful.