How to Change a User's Role in Moodle
Learn how to change a user's role in Moodle 4.5, whether at the course or system level. This guide provides step-by-step instructions for both scenarios, including necessary permissions and tips for role management.
Moodle version: 4.5 Estimated time: 4 minutes Difficulty: Intermediate
Why you'd use this
A user's role controls what they can see and do in Moodle. You might need to change a role when a teacher moves to a support position, a student becomes a course facilitator, or a colleague needs temporary editing access to a course. Roles can be changed at the course level — affecting only that course — or at the system level, which affects the user's access across the whole site.
This guide covers both scenarios.
Before you start
Permissions required:
- To change a role within a course: Teacher role with the capability moodle/role:assign, or Site administrator
- To change a system-level role: Site administrator only
You'll need:
- The name or email address of the user whose role you are changing
- The name of the course affected (for course-level role changes)
- Confirmation of which role you are assigning common roles are Student, Teacher, Non-editing teacher, and Course creator
Not sure if you have the right permissions? Open the relevant course and look for Participants in the course navigation. If you can see it and the enrolled users are listed, you likely have the access needed for course-level changes. For system-level changes, you will need Site administration ask your Moodle administrator if you can't see it.
Note for Moodle 4.5: The Participants page and role assignment flow described in this guide reflect the 4.x navigation structure. If your site was recently upgraded from Moodle 3.x and still uses a legacy theme, some menu locations may differ.
Step-by-step
Part A. Change a role within a course
Step 1: Open the course
Navigate to the course where you want to change the user's role. You can find it via My courses in the primary navigation, or by searching from the site home page.
Step 2: Open the Participants page
In the course navigation menu on the left, click Participants. This shows a list of everyone enrolled in the course along with their current role.

Step 3: Find the user
Scroll through the list to find the user, or use the Search bar above the table to search by name or email address. The user's current role is shown in the Roles column.
Step 4: Open the role editor for that user
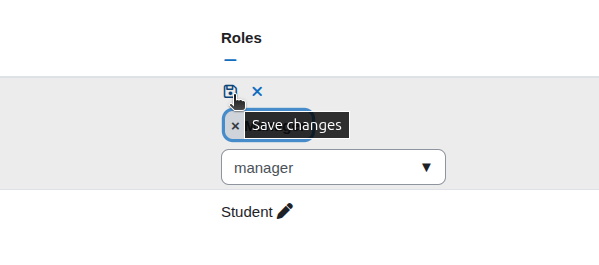
Click the pencil icon (✏️) in the Roles column next to the user's name. The cell will expand to show the current role as a tag, with a dropdown below it to assign an additional role.
Tip: A user can hold more than one role in a course at the same time. For example, someone can be both a Student and a Non-editing teacher. If you want to replace a role rather than add one, remove the existing role in the next step before assigning the new one.

Step 5: Remove the existing role (if replacing)
If you are replacing the user's current role rather than adding a new one, click the × next to the existing role tag to remove it. The role is not removed until you save in Step 7, so you can still change your mind.

Warning: Removing a user's only role in a course does not unenrol them they remain enrolled but with no role assigned, which means they may lose access to course content depending on your site's settings. Always assign the new role before or at the same time as removing the old one.
Step 6: Assign the new role
Click the dropdown that appears beneath the role tag area and select the new role from the list. The role name will appear as a new tag in the cell.

Step 7: Save the change
Click the Save button (the floppy disk icon) that appears at the right-hand end of the row. The Participants list will refresh and show the updated role in the Roles column.
Part B. Change a system-level role
Use this part only if you need to change a user's role across the whole Moodle site for example, promoting someone to Manager or Course creator at the system level.
Step 8: Open Site Administration
Click Site administration in the primary navigation.

Step 9: Navigate to the user's profile
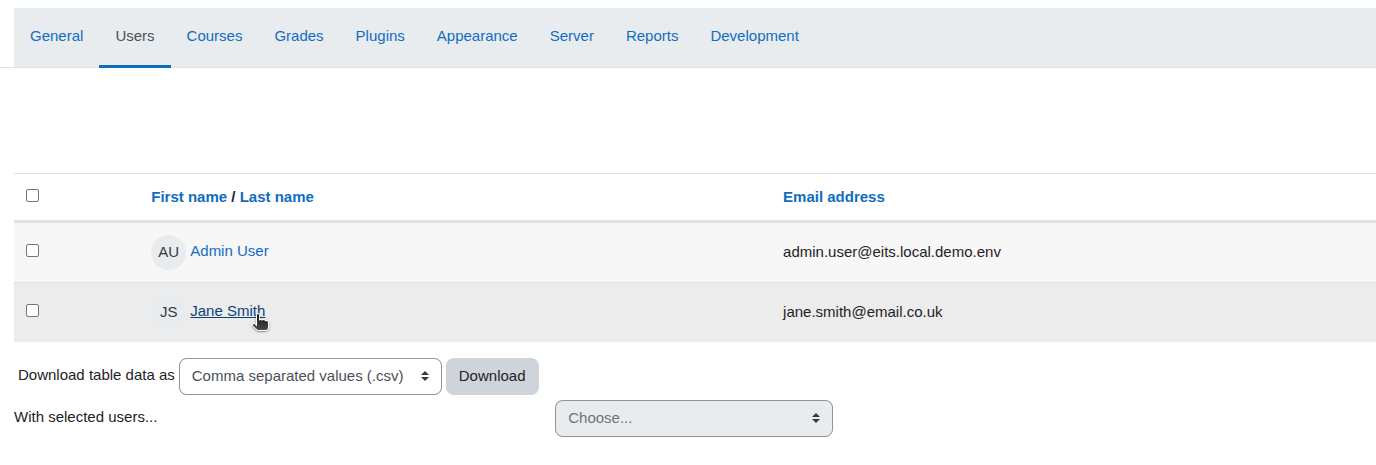
Go to Users > Accounts > Browse list of users. Search for the user by name or email, then click their name to open their profile.
Step 10: Open the role assignments for that user
On the user's profile page, click Preferences under the Administration section. On the Preferences page, under the Roles section, click This user's role assignments.


Verify: Confirm the exact path to system-level role assignment for a specific user in Moodle 4.5 in some configurations this is accessed via Site administration > Users > Permissions > Assign system roles, then locating the user from there.
Step 11: Assign the system role
On the role assignment page, select the role you want to assign from the list on the right, locate the user in the Potential users list, and click Add to move them to the Existing users list.
To remove a system role, find the user in the Existing users list, select their name, and click Remove.
Warning: System-level roles grant permissions across the entire Moodle site, not just a single course. Only assign system roles such as Manager or Site administrator when you are certain this level of access is appropriate.
Check it worked
For a course-level role change: Return to the Participants page of the course. Find the user in the list their updated role should now appear in the Roles column. If you want to confirm their experience, you can use Moodle's Switch role to feature from inside the course to see the course as that role would see it.
For a system-level role change: Go to Site administration > Users > Permissions > Assign system roles, select the role you assigned, and confirm the user appears in the Existing users list.
Common problems
- The pencil icon doesn't appear on the Participants page: You don't have permission to assign roles in this course. Check with your Moodle administrator that your own role includes the moodle/role:assign capability.
- The role I need isn't in the dropdown: The role may not be available for assignment at the course level. Some roles are restricted to system-level assignment only. Ask your administrator to check Site administration > Users > Permissions > Define roles and confirm the role's context is set to include courses.
- The user's access didn't change after the role update: Ask the user to log out and log back in, or wait a few minutes if your site uses caching. Role changes take effect on next page load for the affected user.
- I can't find the user in the Participants list: The user may not be enrolled in the course. Role assignment within a course only applies to users who are enrolled. Enrol the user first, then assign their role.
- I accidentally removed a user's only role: If the user has lost course access, return to the Participants page, find them in the list (they will still appear as enrolled), click the pencil icon, and assign the appropriate role again.
Looking to enhance your Moodle experience? EssingtonITS offers expert IT services to optimise your learning platforms. For tailored Moodle hosting and support, explore our dedicated e-learning services at myelms.co.uk. Let us help you achieve seamless and efficient e-learning solutions.
Moodle is a registered trademark of Moodle Pty Ltd. This channel is independently operated by EssingtonITS and is not affiliated with or endorsed by Moodle.
person people found this useful.